Admit that you have always wanted to know how to develop a Firefox extension but never had the time to learn.
Our objective
We will create a Firefox extension to find all links in the current web page, highlight those which have atarget attribute and alert you how many links it found. The good part is that once you have done this, you have both an understanding of Firefox extension development as well as a blueprint for any extension you would want to develop in the future.What you need – setting up the developing environment
First, let’s start with setting up your development environment. You need Firefox (duh) and basically whatever code editor you prefer. Then, there are some recommended things to do to prepare Firefox:Create a different development profile
The first step is to create a different profile in Firefox, since you will do some settings and changes that you probably don’t want for your regular profile. In my case, I’ve created a new development profile named “dev”. The steps to do this are:Profile manager on Windows
Open the Windows Start menu and choose the Run option (on Vista, it might not be there – just press Windows key + R in that case). In the run dialog, writefirefox -P and press enter/click OK. Choose Create Profile in the dialog and follow the steps.Profile manager on Mac
Open the Terminal (located under /Applications/Utilities) and type in/Applications/Firefox.app/Contents/MacOS/firefox -profilemanager. Choose Create Profile in the dialog and follow the steps.Profile manager on Linux
Open a terminal, useCD to navigate to your Firefox directory and then enter ./firefox -profilemanager. Choose Create Profile in the dialog and follow the steps.Configuration settings for Firefox
Open Firefox through the Profile Manager (process described above, or set the development profile as default during extension development). Then enterabout:config in the address bar. It will warn you about changing settings, but it’s ok since what you will do is only minor changes for development. You can filter the existing settings, and if any of the below settings don’t exist, you can just create them.Recommended settings
These are good to enable extension errors in the Firefox Error Console (Tools > Error Console), disable XUL caching and such.javascript.options.showInConsole = truenglayout.debug.disable_xul_cache = truebrowser.dom.window.dump.enabled = true
Optional settings
These aren’t necessary, but they might help you out. Personally, I don’t use these.javascript.options.strict = trueextensions.logging.enabled = true
Point your Firefox extensions directory to your extension
Instead of constantly preparing and reinstalling your extension, there’s a simple way to add a pointer from your Firefox extensions directory to your code location. To do this, you must first find your profile directory:Find your profile directory
The profile directory is where you will find all the settings for your Firefox profiles, including extension information.Find profile directory on Windows
In Windows 2000 and XP, open Explorer and go toC:\Documents and Settings\[your user name]\Application Data\Mozilla\Firefox\Profiles and in Vista, go to C:\Users\[your user name]\AppData\Roaming.Find profile directory on Mac
Open the Terminal and type inCD ~/Library/Application\ Support/Firefox/profiles/. There you will find your Firefox profiles, and they will be named with letters and numbers, followed by a dot (.) and then your profile name, e.g. 12a3bc4d.dev.Find profile directory on Linux
Open a terminal and type inCD ~/.mozilla/. In that location, you will find all your Firefox profiles, and they will be named with letters and numbers, followed by a dot (.) and then your profile name, e.g. 12a3bc4d.dev.Pointing to an extension
In your development profile folder, you will find a folder namedextensions. In it, you will have code for all your installed extensions. Instead of placing your code there, you can create a pointer file. Do that by creating a file with a unique name for you (this will have to be the same as you chose for your em:id value in your install.rdf file – more on that below).In the case of our example, create a file named
linktargetfinder@robertnyman.com, without any extension, and in it just point it to where you will have your code, e.g. C:\extensions\ (Windows) or ~/Sites/linktargetfinder/ (Mac).Creating folder structure and files
What is needed to have a good base for your extension development, is to create the structure of the extension code. Start by creating this hierarchy: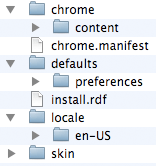
install.rdf
We begin with the intimidating code ofinstall.rdf. This is where you will have all the meta information about your extension, which versions of Firefox it supports and other assorted information. Our install.rdf will look like this:
<RDF xmlns="http://www.w3.org/1999/02/22-RDF-syntax-ns#"
     xmlns:em="http://www.mozilla.org/2004/em-RDF#">


  linktargetfinder@robertnyman.com

  Link Target Finder
  1.0
  2
  Robert Nyman

  Finds links that have a target attribute
  http://www.robertnyman.com/
  chrome://linktargetfinder/content/options.xul


    {ec8030f7-c20a-464f-9b0e-13a3a9e97384}
    2.0
    3.1b2
In the Description node
em:id- This is where you add your unique developer id, of your own choosing. Note that this has to be the same as the pointer file you created above.
em:name- The name of your extension.
em:version- Current version of your extension.
em:type- The type declares that is an extension, as opposed to, for instance, a theme.
em:creator- Well, you!
em:description- Describes your extension functionality. Will be shown in the Tools > Add-ons window.
em:homepageURL- The URL of your extension’s web site.
em:optionsURL- The URL to where you will have your file for editing options/preferences.
In the Description/em:targetApplication node
em:id- This value is the actual id of Firefox. Change this if you want to develop for Thunderbird or something else.
em:minVersion- The minimum version of Firefox required to run the extension. Valid Application Versions.
em:maxVersion- The maximum version of Firefox required to run the extension. Valid Application Versions.
chrome.manifest
The chrome of Firefox is everything around the content window. i.e. web browser toolbar, menus, statusbar etc. The next file for our extension, which will probably feel a bit awkward to edit, is thechrome.mainfest file. This one, however, is in conjunction with install.rdf the key to how your extension will be added to Firefox, and how it will work. Our chrome.manifest file looks like this:content linktargetfinder chrome/content/
content linktargetfinder chrome/content/ contentaccessible=yes
overlay chrome://browser/content/browser.xul chrome://linktargetfinder/content/browser.xul
locale linktargetfinder en-US locale/en-US/
skin linktargetfinder classic/1.0 skin/
style chrome://global/content/customizeToolbar.xul chrome://linktargetfinder/skin/skin.csscontent linktargetfinder chrome/content/- The path to where your extension content files will be found.
content linktargetfinder chrome/content/ contentaccessible=yes- Same as the above, but when
contentaccessible=yesis added, it allows Firefox 3 and later to access the extension’s files and show them in the web browser (like within a web page). Found this excellent help through Web pages accessing chrome:// is forbidden. overlay chrome://browser/content/browser.xul chrome://linktargetfinder/content/browser.xul- The path to which file you will use to override web browser elements, and add items to the toolbar, menu and statusbar.
locale linktargetfinder en-US locale/en-US/- Used for localization of content.
skin linktargetfinder classic/1.0 skin/- Skin reference.
style chrome://global/content/customizeToolbar.xul chrome://linktargetfinder/skin/skin.css- Style overlays for chrome pages.
chrome folder
Ok, once the mandatory parts are out of the way, now things start to get interesting. This is also when we start to look at XUL, which stands for XML User Interface Language. It is developed by Mozilla to create interfaces in Firefox, Thunderbird etc.First, within the
chrome/content folder, create three files:browser.xuloptions.xullinkTargetFinder.js
browser.xul
This is the file we will use to override some of the default look of the web browser, i.e. add a button to the toolbar, an item to the Tools menu and a statusbar icon. Let’s look at the complete browser.xul file and then break it down:
http://www.mozilla.org/keymaster/gatekeeper/there.is.only.xul">
No comments:
Post a Comment